# 9.源码学习
1.数据驱动
new Vue()的过程:
执行_init方法,在_init中调用原型上的$mount方法(在$mount方法的结尾调用mounted钩子并返回vm实例,提示类组件就是利用这一特性使得 dom 插入到 body 中),$mount原始定义在src/platforms/web/runtime/index.js中,在$mount中实际调用的是mountComponent方法,mountComponent定义在 src/core/instance/lifecycle.js中,它的 核心就是先实例化一个渲染Watcher,在它的回调函数中会调用 updateComponent 方法,在此方法中调用vm._render 方法先生成虚拟 Node,最终调用 vm._update 更新 DOM。
vm._render定义在src/core/instance/render.js中,它实际调用的是$options中的render方法来生成虚拟 Node,render通过compileToFunctions生成并且赋值到options上(见src/platforms/web/entry-runtime-with-complier.js)或者用户手写,用户手写render和template会直接忽略template,render的参数createElement方法实际是内部的_createElement方法,在_createElement内部主要做两件事:children 的规范化、创建VNode
2.Vue 的初始化过程
function Vue (options) {
  if (process.env.NODE_ENV !== 'production' &&
    !(this instanceof Vue)
  ) {
    warn('Vue is a constructor and should be called with the `new` keyword')
  }
  this._init(options)
}

initMixin(Vue) ├──Vue.prototype._init // new的时候如果提供el在_init方法末尾自动调用$mount方法,然后会走mounted钩子
                                      //  if (vm.$options.el) { vm.$mount(vm.$options.el) }
                                      // 总结:提供el自动调$mount,或者手动$mount都在mountComponent末尾调mounted钩子
               ├──initLifecycle(vm)
                  initEvents(vm)
                  initRender(vm)
                  callHook(vm, 'beforeCreate')
                  initInjections(vm) // resolve injections before data/props
                  initState(vm) // props->methods->data->computed->watch
                  initProvide(vm) // resolve provide after data/props
                  callHook(vm, 'created')
--------------------------------------------------------------------------------------------------
stateMixin(Vue) ├──Vue.prototype.$set
                ├──Vue.prototype.$delete
                ├──Vue.prototype.$watch
--------------------------------------------------------------------------------------------------
eventsMixin(Vue) ├──Vue.prototype.$on
                 ├──Vue.prototype.$once
                 ├──Vue.prototype.$off
                 ├──Vue.prototype.$emit
--------------------------------------------------------------------------------------------------
lifecycleMixin(Vue) ├──Vue.prototype._update // _update 的核心就是调用 vm.__patch__ 方法,把 VNode 转换成真正的 DOM 节点
                    ├──Vue.prototype.$forceUpdate
                    ├──Vue.prototype.$destroy

renderMixin(Vue)  ├──Vue.prototype.$nextTick
                  ├──Vue.prototype._render // 实际调用的是options.render,为用户手写render或者仅提供template时通过
                                           // compileToFunctions返回并复制到options上,见entry-runtime-with-complier.js
                                           //  if (!options.render) {...}
                                           // 总结:render的优先级高于template
--------------------------------------------------------------------------------------------------
export default Vue
3.vm.$vnode 表示 Vue 实例的父虚拟 Node,所以它为 Null 则表示当前是根 Vue 的实例,实际根节点(通过 new 产生)的$vnode 为undefined。
4.render的参数createElement实际调用_createElement,_createElement中有一个判断逻辑的调用createComponent创建自定义组件,该方法有三个作用:
- 通过
Vue.extend构造子类构造函数 - 安装组件钩子函数
- 实例化 VNode
5 documenn.body 指body,document.documentElement指html
6.insertedVnodeQueue 的添加顺序是先子后父,所以对于同步渲染的子组件而言,mounted
钩子函数的执行顺序也是先子后父,created是先父后子。
$destroy 的执行过程中:
callHook(vm, 'beforeDestroy')- 把自身从父组件
$children中移除 - 销毁事件监听
vm._watcher.teardown() - 执行
vm.__patch__(vm._vnode, null)触发它子组件的销毁钩子函数,一层层的递归调用,所以destroy钩子函数执行顺序是先子后父,和mounted过程一样 callHook(vm, 'destroyed')vm.$off()移除事件监听
在 react 中,父子组件的生命周期顺序和 Vue 类似:parent will mount->parent render->child will mount->child render->child did mount->parent did mount

7.组件注册
全局注册
Vue.component(id, definition)全局注册组件的时候,id可以是连字符、驼峰或首字母大写的形式。全局注册是扩展到
Vue.options下,所以在所有组件创建的过程中,都会从全局的Vue.options.components扩展到当前组件的vm.$options.components下,这就是全局注册的组件能被任意使用的原因。8.数据响应的过程
initState(vm) // props->methods->data->computed->watchinitData包含两步,proxy:实现通过vm.xx访问vm._data.xx;observe:在new Observer的构造函数中调用defineReactive,defineReactive的setter中定义dep.notify()实现数据更新
nextTick
在浏览器环境中,常见的 macro task 有 setTimeout、MessageChannel、postMessage、setImmediate;常见的 micro task 有 MutationObsever 和 Promise.then、process.nextTick。
- 在同一事件循环中,当所有的同步数据更新执行完毕后,才会调用 nextTick
- 在同步执行环境中的数据完全更新完毕后,DOM 才会开始渲染。
- 在同一个事件循环中,若存在多个 nextTick,将会按最初的执行顺序进行调用。
- 每个异步的回调函数执行后都会存在一个独立的事件循环中,对应自己独立的 nextTick
- vue DOM 的视图更新实现,,使用到了 ES6 的 Promise 及 HTML5 的 MutationObserver,当环境不支持时,使用 setTimeout(fn, 0)替代。上述的三种方法,均为异步 API。其中 MutationObserver 类似事件,又有所区别;事件是同步触发,其为异步触发,即 DOM 发生变化之后,不会立刻触发,等当前所有的 DOM 操作都结束后触发。
setTimeout这个函数,是经过指定时间后,把要执行的任务加入到Event Queue
watch的写法:
watch:{
  num:['numChange','numChangeOne'],
  num:'thirdMethod',
  num(){},
  num:{
    deep:true,
    handler(){ console.log('this is option handler') }
  }
}
vm.$watch('num',_=>{})
vm.$watch('num',{immediate:true,handler(){}})
- 编译
compileToFunctions
编译使用了柯里化函数,避免了重复传参数,核心为src/compiler/create-compiler.js中定义的createCompilerCreator方法,可大致简化如下:
export function createCompilerCreator (baseCompile: Function): Function {
  return function createCompiler (baseOptions: CompilerOptions) {
    return function compileToFunctions (
      template: string,
      options?: CompilerOptions,
      vm?: Component
    ): CompiledFunctionResult {
      // 最终使用外层传递的function处理内层的参数
      return baseCompile(baseOptions,template,options?,vm?)
    }
  }
}
baseCompile、baseOptions都是可固化的参数- 其中
createCompilerCreator (baseCompile: Function)返回一个传入baseOptions的函数,其调用见src/compiler/create-compiler.js,const createCompiler就是传入baseOptions的函数
export const createCompiler = createCompilerCreator(function baseCompile (
  template: string,
  options: CompilerOptions
): CompiledResult {...})
const createCompiler的下一步调用在src/platform/web/compiler/index.js,返回一个传入template、options、vm的函数compileToFunctions
const { compile, compileToFunctions } = createCompiler(baseOptions)
- 最后带编译器的 Vue 通过
compileToFunctions传入template、options、vm返回staticRenderFns、render,compileToFunctions的调用见src/platform/web/entry-runtime-with-compiler.js
const { render, staticRenderFns } = compileToFunctions(
  template,
  {
    shouldDecodeNewlines,
    shouldDecodeNewlinesForHref,
    delimiters: options.delimiters,
    comments: options.comments,
  },
  this
)
以上,就是使用函数柯里化技巧,为加深理解,可写一个简单的函数:
function curry(func) {
  return function(b) {
    return function(c, d) {
      return func(b, c, d)
    }
  }
}
let result1 = curry((a, b, c) => {
  return (a + 1) * b * c
})
let result2 = result1(3)
let result3 = result2(4, 5) //80
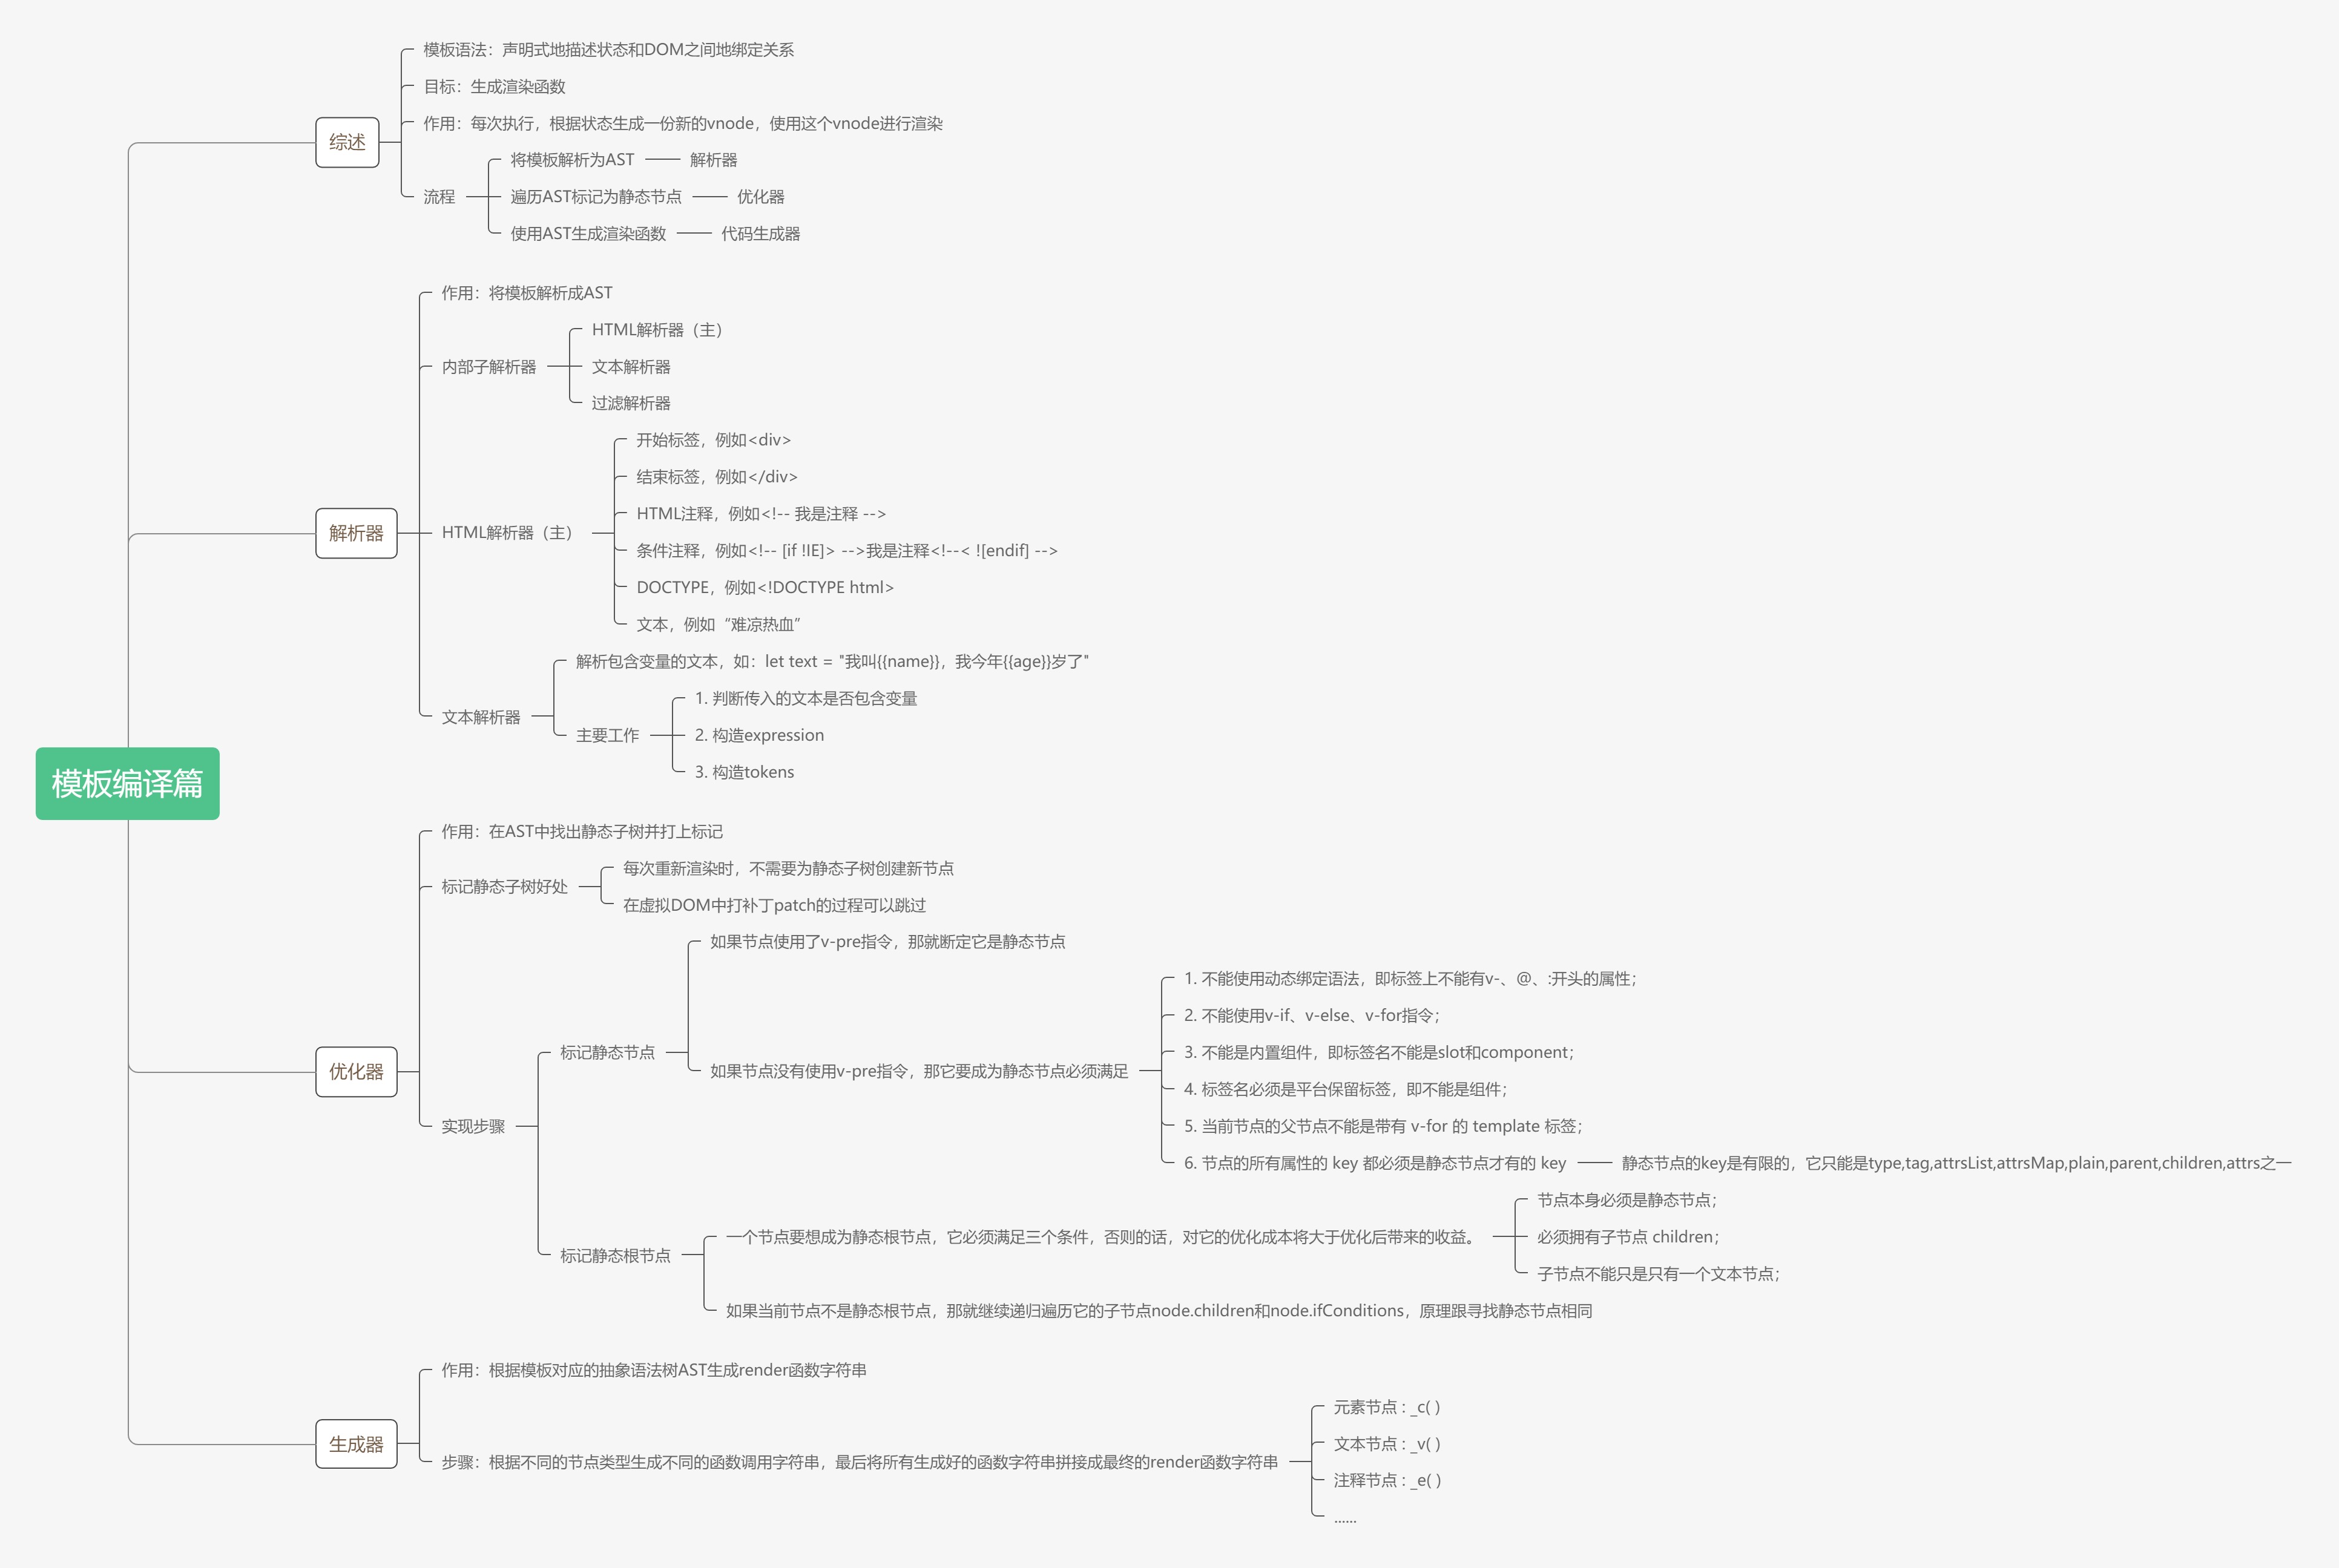
12、源码编译篇思维导图
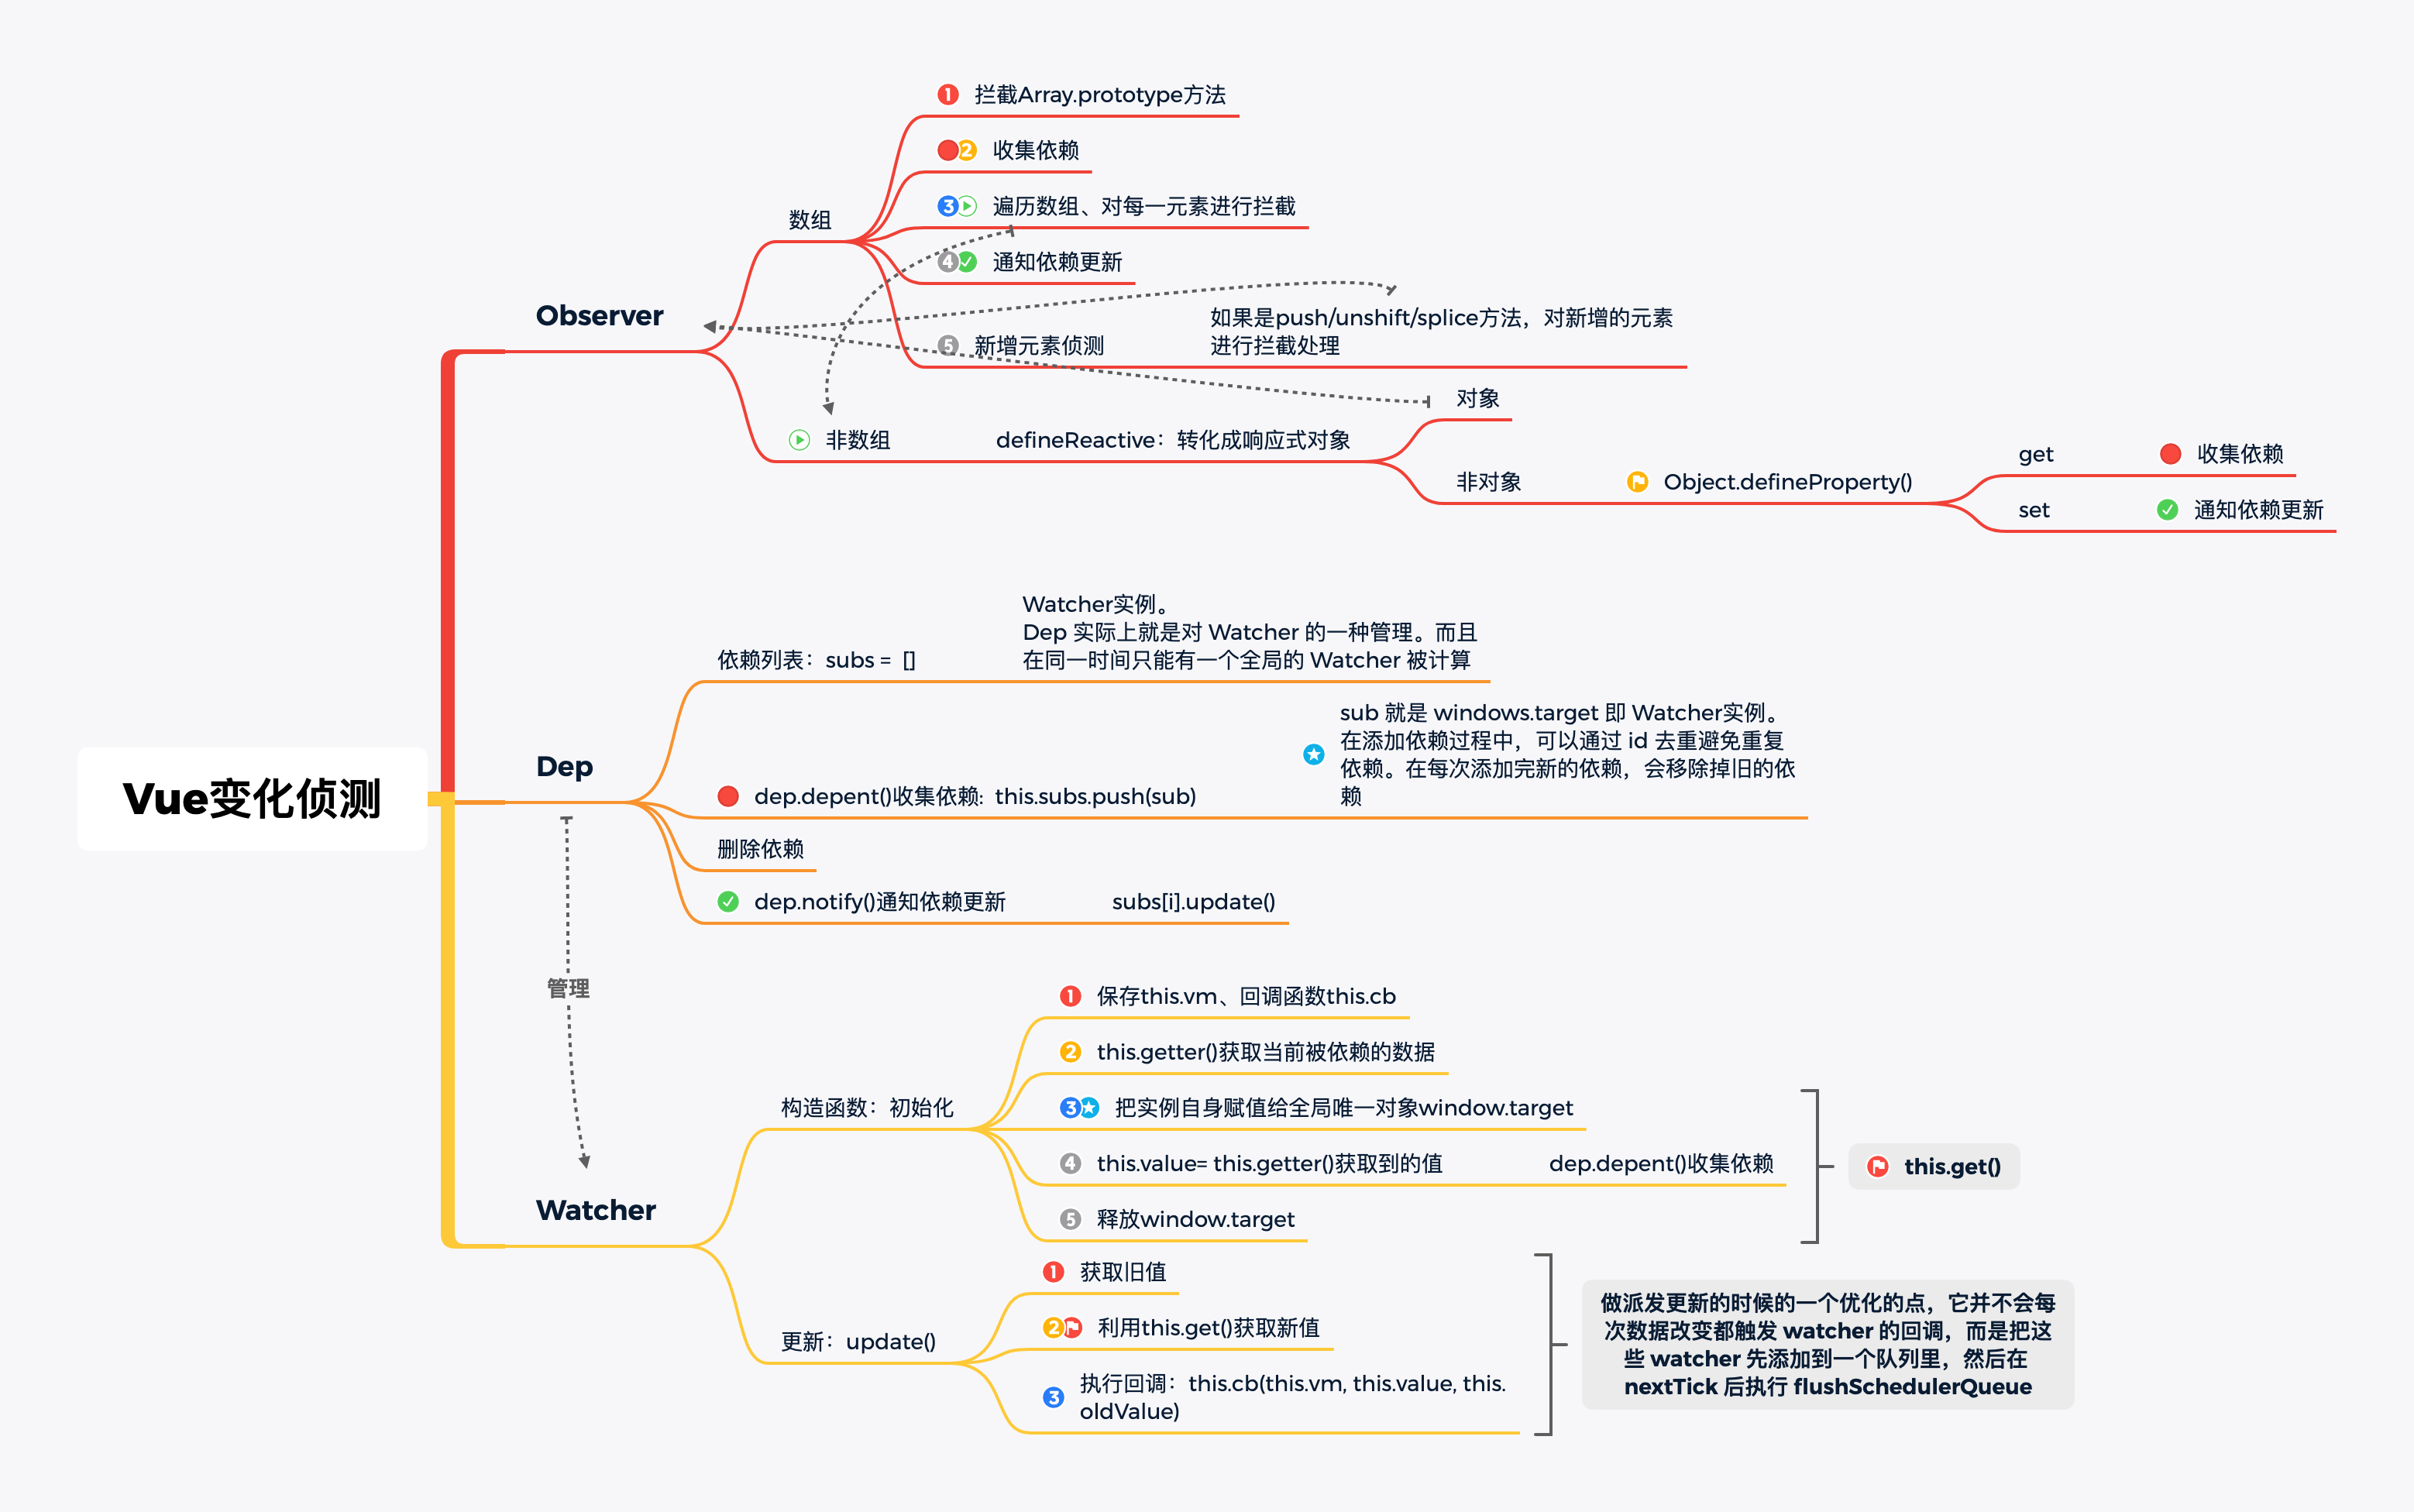
13、源码响应篇思维导图